Introduction
I’m building my minium-viable-product personal website A.K.A v.1.0.1 using Hugo from scratch, a fast and flexible static site generator. This project is mainly inspired by the these websites:
What resonated with me from these websites is that they are all direct and distraction-free, emphasizing on the content which is big plus!
In the future (v2.0.1), I plan to incorporate elements of Swiss Design for a clean, modern aesthetic. And design a more seamless Obsidian to Hugo integration as per NetworkChuck YT Video.
After distilling and organizing my original notes, this walkthrough follows the official Hugo documentation and Cloud’s Cannon, not sponsored, begginer tutorial series. Let’s get started!
1. Prerequisites Section - Basic Software
Before using Hugo, ensure you have the following tools installed:
- Git: Follow the installation guide.
- Go: Verify the installation with
go version. Try a simple [[# Hello World in Go]] program to test it: - Dart Sass: Install via Chocolatey. You need to have chocolatey installed, checkout my [[#Chocolatey Instalation Guide]]
choco install sass
- Hugo: Install hugo via chocolatey. And if you have issues with not seing Hugo inside VS Code add the hugo.exe path to the environment variables. You can always check if its downloaded correctly running
hugo versionin the terminal
choco install hugo-extended
I think it is good practice to use a file versioning system, by that I mean git & gitbhub. You can follow my brief guide for begginers on [[#File versioning made easy]]
2. Building the Website
2.1 Initial Setup
- Create a new repository on GitHub (e.g.,
personal-website). - Clone the repo locally:
- Create a new Hugo site with the CLI tool (you need to CD into the parent’s dir):
hugo new site personal-website
- Start the Hugo server. As no theme is used, this is expected to be broken. Don’t worry about it
hugo server
2.2 Adding Content
Build the home page
- In a new file ‘content/_index.html’, create the home page:
---
title: Home
---
Hello World! This is my first page. 🔝
- In a new file ’layouts/_default/list.html’, create the needed layouts
<!DOCTYPE html>
<html lang="en">
<head>
    <meta charset="UTF-8">
    <meta name="viewport" content="width=device-width, initial-scale=1.0">
    <title>{{ .Page.Title}}</title>
</head>
<body>
    {{ .Content }}
</body>
</html>
- Render the page
hugo serve
Add an about section
- In a new file ‘content/about.html’, create the about page:
---
title: About
---
Imagine this is a Lorem Ipsum
- Refactor the layouts
- Now ’layouts/_default/baseof.html’ is:
<!DOCTYPE html>
<html lang="en">
<head>
    <meta charset="UTF-8">
    <meta name="viewport" content="width=device-width, initial-scale=1.0">
    <title>{{ .Page.Title}}</title>
</head>
<body>
    {{ block "main" .}}
    {{ end }}
</body>
</html>
- Now ’layouts/_default/list.html’ is:
{{ define "main"}}
    {{ .Content}}
{{ end}}
- This has defined a ‘main block’ where we are passing the context ‘.’
- I understand that Hugo renders both the Home and About .md files with the baseof layou that then calls the main content frmom the list.html base layout. That is, it renders (? translates the .md to the index.html for each page, you can audit this in the public directory) the text below the YAML in each .md file
- Write some awesome styles (Imagine this css is more impresive)
body {
    width: 400px;
    margin: 0 auto;
    font-family: sans-serif;
  }
- Add the newly writen styles globaly to all the webpages (as all pages use first the base layout they’ll inherit this unless otherwise specified?)
- Now ’layouts/_default/baseof.html’ is:
 <!DOCTYPE html>
<html lang="en">
<head>
    <meta charset="UTF-8">
    <meta name="viewport" content="width=device-width, initial-scale=1.0">
    <title>{{ .Page.Title}}</title>
    {{ $styles := resources.Get "sass/main.scss" | css.Sass | minify }}
    <link rel="stylesheet" href="{{ $styles.Permalink }}" media="screen">
</head>
<body>
    {{ block "main" .}}
    {{ end }}
</body>
</html>
- For more detail check Asset Management ( Go Pipes ). Hugo recomends:
{{ $style := resources.Get "sass/main.scss" | css.Sass | resources.Minify | resources.Fingerprint }} <link rel="stylesheet" href="{{ $style.Permalink }}">
Add a navbar and footer
This uses Hugo partials. The following part asumes you have already deployed with github pages
- Modify the hugo.toml to include your page’s url
- Modificar el base URL
baseURL = 'https://notyetfound404.github.io/personal-website/'
languageCode = 'en-us'
title = 'My New Hugo Site'
- Create ’layouts/partials’ and ’layouts/partials/nav.html’. Note that we are using absURL, this calls upon the baseURL modified in the previous step
<nav>
    <ul>
        <li> <a href= {{ absURL "" }} > Home </a> </li>
        <li> <a href= {{ absURL "about/" }}> About </a> </li>
    </ul>
</nav>
- Create a partial (named meta for convenience) to clean the sass import. Now ’layouts/partials/meta.html’ is:
<meta charset="UTF-8">
<meta name="viewport" content="width=device-width, initial-scale=1.0">
<title>{{ .Page.Title}}</title>
{{ $styles := resources.Get "sass/main.scss" | css.Sass | resources.Minify }}
<link rel="stylesheet" href="{{ $styles.Permalink }}" media="screen">
- Create a simple footer inside partials. Now ’layouts/partials/footer.html’ is:
{{ with .Params.hide_footer }}
 <!-- No footer here! -->
{{ else }}
 <footer>
    Copyright © {{ now.Year }} | {{ .Site.Params.name }} | All rights reserved
    <br>
    Powered by <a href="https://gohugo.io/">Hugo</a>
 </footer>
{{ end }}
The use of .Params.hide_footer calls upon the yaml defined hide_footer parameter
5. Include the meta, navbar and footer in the base layouts. Now ’layouts/_default/baseof.html’ is:
<!DOCTYPE html>
<html lang="en">
<head>
    {{ partial "meta.html" . }}
</head>
<body>
    {{ partial "nav.html"}}
    {{ block "main" .}}
    {{ end }}
    {{ partial "footer.html" .}}
</body>
</html>
Setup Hugo with blogging capabilities
- Create a new folder
content/posts/to store all blog posts. - Create
_index.mdinside theposts/folder. - Set up a layout for blog posts:
- Create
layouts/posts/(same name as step 1).
- Create
- Create
layouts/posts/list.html, the default layout used by_index.md:
{{ define "main" }}
    <h1>My Posts</h1>
    <ul>
    {{ range .Page}}
        <li>
            <a href="{{ .Permalink }}"> {{ .Title }} </a> - {{ .Date.Format "January 2, 2006"}}
        </li>
    </ul>
{{ end }}
- Create
single.html, the layout for individual blog posts:
{{ define "main" }}
    <h1>{{ .Params.Title }}</h1>
    <p>{{ .Date.Format "January 2, 2006" }}</p>
    {{ .Content }}
{{ end }}
- Create a new post! Don’t forget the front matter (YAML metadata) required in step 5.
---
title: I Like to Roar
date: 2022-04-03
---

Up next,

I'm going to include all the documentation on how I built this site:
- Clean the site before deployment:
hugo --cleanDestinationDir --minify
2.3 Publish with Github Pages
Follow along
- Visit your GitHub repository. From the main menu choose Settings > Pages. > deploy from a branch changed to github actions
- Create a file named
hugo.yamlin a directory named.github/workflows. and add the sample config - Commit and push the new hugo config
Other / Miscelaneous
File versioning made easy
If you’ve never made a Github repo and don’t care to learn about git commands, but want to have an organized codebase. You are likely a beginner, like me.
I will briefly explain how to setup a basic Github Repo and how to connect to it with VS code and make changes (A.K.A commits). I would still highly recomend you look into the oficial docs (As the Arch Linux community would say, READ THE DOCS!!). Also, it is good practice being familiar with the terminal and learning some basic git commands.
This is by no means and exhaustive guide. I’m assuming you already have installed Git, have created a Github Accoun (try to secure it with 2FA), and setup your Git’s mail and name.
A. Initial GitHub Setup
- Create a new github repo
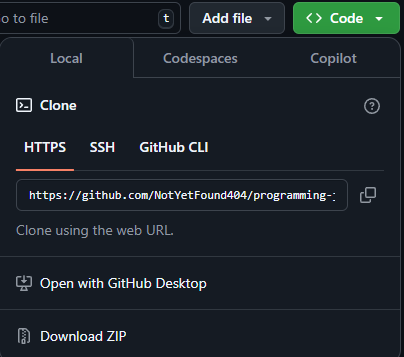
- Copy the URL
B. Local Machine
- Open VS Code
- CD into your Desktop
- In VS code’s start page you’ll see the following
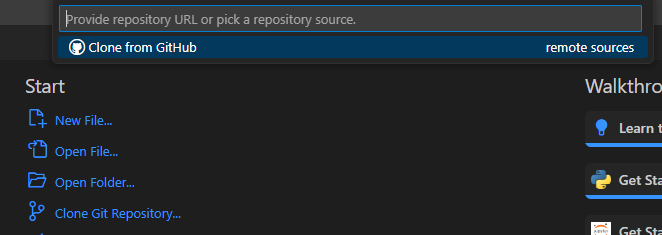
- Clone Git Repo > Paste the URL
- When you are done. Go to VS Code left tab, then source control, find the commit and add some text and add the changes to your repo!
- By now, the changes you have made should be displayed in your Github’s online repo. Check if they are by opening the repo on your preferred search engine.
Hello World in Go
This is the explanation of Programing Journey project 31.01.2025 code
package main
import "fmt"
func main() {
    fmt.Println("Hello, World!")
}
- You can run it with:
go run hello_world.go
- Don’t forget to comit the changes to the repo!
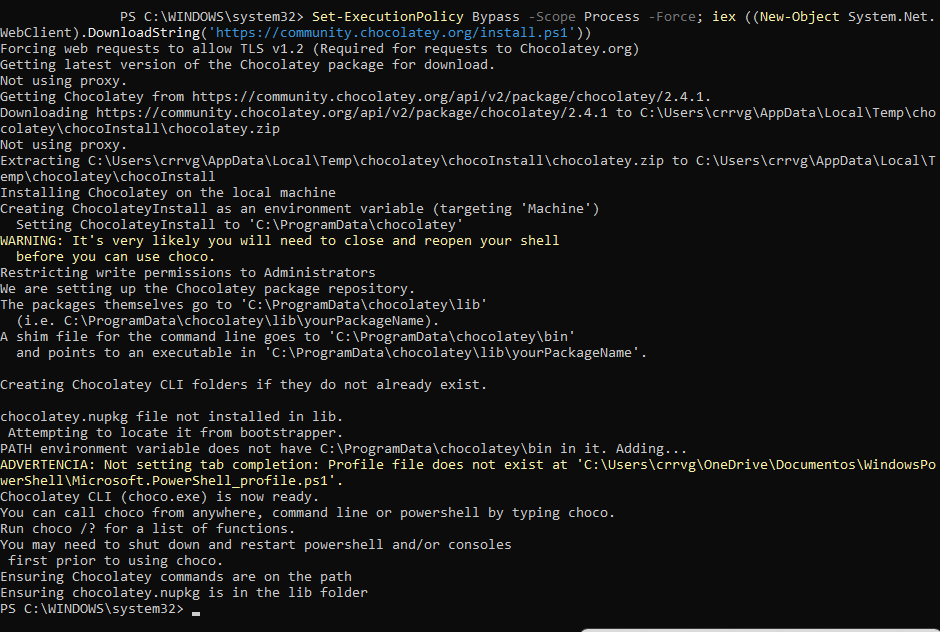
Chocolatey Instalation Guide
Follows Chocolatey install
- In the powershell do the following
Set-ExecutionPolicy Bypass -Scope Process -Force; iex ((New-Object System.Net.WebClient).DownloadString('https://community.chocolatey.org/install.ps1'))